Yep! I’m back from my vacation without with limited Internet access and know that you would like to hear what we got up to (well maybe not but I’m going to share anyway ![]() ).
).
But first let me share some cool tips I’ve learnt while getting ready to write about my vacation — I’ll tell you about our holiday adventures in my next post.
Image Hack
David Warlick demonstrated a really cool image hack that I’ve wanted to try.
If you post a smaller version of a photo in your blog post, but hyperlink to the larger version of the photo when readers click on the photo in the post they are taken to the larger version of the photo for a more detailed view.
Click this photo I took on our vacation to see the effect . Here are my step-by-step instructions (which I’ve posted to Flickr) for how to do this in your own posts.
As David Warlick says Wow! It worked!
Flickr Videos
Everyone’s been talking about how Flickr now allows you to upload videos provided that they are limited to 90 seconds in length, and less than 150MB in filesize. I like the idea of uploading my videos to Flickr since I already use the site for sharing photos.
Using the video setting on my digital camera to create the videos is an issue because the videos ranged up to 93 MB for a 90 sec video which isn’t ideal for uploading videos especially at an Internet Cafe. Ideally it’s best to keep videos less than 30 MB for uploading.
My solution to reduce video file size quickly was edit using MovieMaker and save Movie File as Video for Broadband (512 kbps).
Off course this got me thinking how does Flickr control the time limit on movies you can upload? Well it seemed obvious to me that they couldn’t and can only control by file size. So I edited and combined my photos and movies to create a 3 minute video which I then successfully uploaded to Flickr.
Here are my instructions on using MovieMaker. The videos uploaded considerably easier and there was no noticeable loss in quality.
My Map Of Our Holiday
I’ve been waiting for a long time for the opportunity to create a holiday map with photos and this was a perfect opportunity.
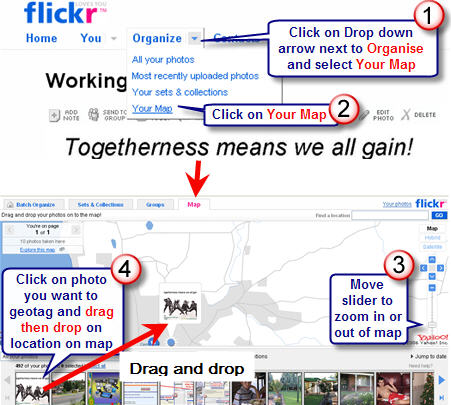
The easiest option is to Geotag photos on Flickr (geotagging in Flickr is the process of adding location information to your photos by dropping them onto the World map — here are my instructions on how to geotag using Flickr).
However I had two issues with Flickr geotagging:
- Flickr uses Yahoo maps that don’t zoom in sufficiently to show roads and many towns in Western Australia — which is really annoying
- You can only link to the map and not embed
So instead I created a My Maps using Google Maps that:
- I can embed into my blog post
- allows me to embed my photos from Flickr into the map (unfortunately it didn’t like the embed video code for the Flickr Videos).
Here are my step-by-step instructions (which I’ve posted to Flickr) for how to create your own My Maps using Google Maps. You will need to create a Google Account to create my maps (it’s best to create a gmail account to do this).
Below is my map that I’ve embedded in this post. You will probably need to check it out on my blog if you are using a feed reader.
View Larger Map
Embedding My Maps Into Edublogs
- Click on the link icon at the top of My Maps and you will find the embed code.
- In your post click on Code Tab then paste the embed code in the desired location and then press publish straight away.
NOTE: Make sure you’ve completely finished writing your post before adding My Maps embed code as you can’t edit the post AT ALL after the code has been added.
FINAL THOUGHTS
Hope you like some of the cool tips I’ve shared.
What are your thoughts on Flickr videos? People have differing views on videos on Flickr — check out Beth’s post and it’s comments.
Do you know of a quicker and easier way to create a Holiday map for sharing with friends?

Leave a comment